


A simple clay bowl passes through at least a dozen steps before it can hold soup. Several of them involve waiting, and two involve a kiln hot enough to change the clay forever. Understanding the sequence turns pottery from a mystery into a craft you can actually follow, whether you plan to try it or just want to appreciate the next handmade cup you pick up.
Step one: preparing the clay
Fresh clay often contains air pockets, and those are a potter’s enemy. A trapped bubble expands when the piece is fired and can crack or burst the whole vessel. To prevent that, potters knead the clay in a process called wedging. It is the same pushing, folding and turning motion bakers use on dough, and it does two things: it removes air and it makes the clay uniform in moisture and texture.
Skipping this step is one of the quickest ways for beginners to lose a piece in the kiln. Even a few minutes of careful wedging makes a visible difference to how the clay behaves on the wheel.
Step two: centering and opening
On the wheel, the ball of clay must sit exactly in the middle of the spinning head. This is called centering, and it is famous for being the hardest early skill. The potter braces both arms against the body, applies steady pressure with wet hands and lets the clay rise and settle until it spins without any wobble.
Once centered, the potter pushes a thumb down into the middle to create the opening, leaving a floor of clay at the bottom. Getting that floor thickness right matters. Too thick and the base dries unevenly, too thin and it may crack or sag when the bowl is lifted.
Step three: pulling up the walls and shaping
With the opening made, the potter squeezes the clay between inside and outside fingers and draws it upward as the wheel turns. Each pull thins the wall and raises the height. For a bowl, the potter then eases the walls outward, supporting the shape from inside while a rib or finger gives the curve its final form.
Speed and water are both careful balances here. Too much water weakens the clay and slumps the walls. Too little creates friction that twists the piece. Experienced potters often describe the process as a conversation: the clay tells them what it can do, and they respond.
Step four: drying to leather-hard
The finished shape comes off the wheel soft and fragile. It needs to dry slowly until it reaches a stage called leather-hard, firm enough to hold its shape but still slightly damp. The name is accurate: the clay feels a bit like firm cheese or the sole of a leather shoe.
Uneven drying is the great hazard. If the rim dries faster than the base, the wall pulls and cracks. Potters often cover pieces loosely with plastic or place them away from drafts and direct sunlight so the water leaves gradually.
Step five: trimming and adding a foot
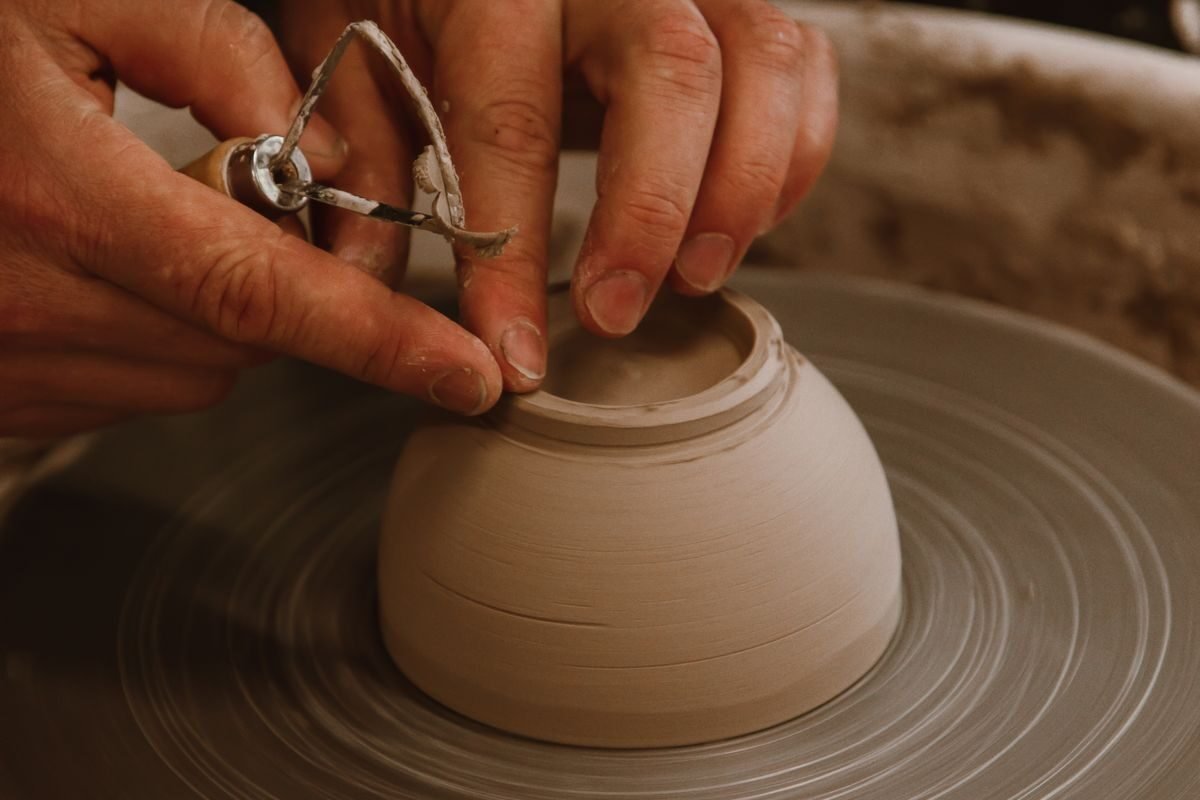
At leather-hard, the bowl is flipped upside down on the wheel and trimmed. Using a loop tool, the potter removes excess clay from the base and carves a small foot ring, the raised circle the bowl stands on. A foot ring lifts the main body slightly off the table, makes the bowl easier to glaze, and gives it a lighter, more finished look.
This is also the stage where handles are attached and surface decoration (stamps, carved lines, a coat of colored slip) is applied. Slip is a liquid mixture of clay and water, and it can be painted on to give a different color or texture.
Step six: the first firing
Before it can be glazed, the piece must dry completely until it is bone dry, then go into the kiln for its first firing. This one is called a bisque firing, and it typically reaches a temperature of roughly a thousand degrees Celsius, though the exact figure depends on the clay and the workshop. The heat drives out the last chemically bound water and turns soft clay into hard but porous ceramic.
The piece shrinks during drying and firing, commonly by around a tenth or more of its original size, which is why potters make things a little larger than the final intended dimensions.
Step seven: glazing
A bisque-fired bowl is porous, a bit like a sponge, which makes it easy to apply glaze. Glaze is a mixture of minerals suspended in water that melts into a glassy coating during firing. The potter may dip the bowl, pour glaze over it, or brush it on. Each method gives a slightly different result.
Two rules matter here. First, the bottom of the foot ring must be wiped clean of glaze, otherwise the bowl will fuse to the kiln shelf. Second, glaze color before firing rarely matches the color afterward. Many glazes look dull and chalky when raw and only reveal their true color after the heat does its work.
Step eight: the glaze firing
The glazed bowl goes back into the kiln for a second firing, usually at a higher temperature than the first for stoneware and sometimes lower for earthenware. During this firing the glaze melts and fuses to the clay, and the clay itself matures into its final hardness. Cooling is as important as heating: opening the kiln too early can shock the pieces and crack the glaze.
When the kiln cools and the bowl comes out, it is ready for use, although some glazes are intended for decoration only and are not suitable for food. A potter should be able to tell you whether a piece is food-safe.
A note on handmade and regional traditions
Pottery traditions around the world follow this same skeleton while differing in clay, glaze and decoration. Morocco has a long ceramic heritage, with cities such as Safi and Fez known for their pottery, and each region has its own forms and patterns. Visiting a workshop is one of the best ways to understand how many small decisions go into an object that looks effortless.
Frequently asked questions
How long does it take to make a pottery bowl from start to finish?
The hands-on shaping might take under an hour, but drying, two firings and cooling stretch the whole process over one to several weeks.
Why do pottery pieces crack during firing?
The most common causes are trapped air, uneven wall thickness and drying too quickly. Any of these creates stress inside the clay that heat then releases as a crack.
What is the difference between bisque and glaze firing?
Bisque firing hardens the raw clay into porous ceramic so it can be handled and glazed. Glaze firing melts the glaze into a glassy surface and finishes the clay.
Is handmade pottery safe for food?
It can be, provided the glaze is formulated and fired correctly for food use. Ask the maker, or choose pieces clearly sold as food-safe, especially for acidic foods and hot liquids.
Do I need a wheel to make pottery?
No. Hand-building methods such as pinch pots, coils and slabs need no wheel and are a gentle way to learn how clay behaves.
What the process teaches
Pottery rewards patience at nearly every stage: kneading, waiting, drying, firing, cooling. The bowl you finally hold is the sum of all that restraint. Next time you drink from a handmade cup, turn it over and look at the foot. It carries the clearest signs of the hands that made it.